Node.js 的模块分为三种:
- 核心模块
- 第三方模块
- 本地模块
本篇重点介绍 Node.js 中的核心模块,包括
| 核心模块 | 作用 |
|---|---|
| path | 路径相关 |
| fs | 操作文件 |
| os | 提供相关操作系统信息 |
| http | 搭建 http 服务器 |
| querystring | 解析请求参数 |
path
path 是我们介绍的第一个核心模块,所以有必要介绍如何引入核心模块。引入核心模块很简单,直接 require('xxx') 即可,例如我们引入 path 模块
const path = require("path"); |
path 是与路径有关的模块,再介绍 path 之前,介绍两个与路径有关的变量, __dirname 与 __filename:
- __dirname:表示当前模块所在的目录,是一个表示绝对路径的字符串
- __filename:表示当前模块(文件)所在的路径,也是一个表示绝对路径的字符串
这两个变量都是全局变量 global 的属性,所以可以直接在模块中访问
// D:\Desktop\Node\2 核心模块\1. path.js |
将讲解 path 模块提供的 API 之前,首先我们明确一下路径的组成
┌─────────────────────┬────────────┐ |
可见路径可以被划分为两部分:
- dir:文件所在目录
- base:文件名称(包含扩展名)
而 base 也可以被划分为两部分:
- name:文件名称
- ext:扩展名
dirname
path.dirname(path) 返回的是给定路径的目录
const path = require("path"); |
basename
path.basename(path, [ext]) 返回路径的最后一个部分,它会忽略最后的目录分隔符(如果有的话)
const path = require("path"); |
basename() 还接收一个可选参数,表示文件的扩展名,如果传入的扩展名与路径最后一部分的扩展名相同,则返回没有扩展名的文件名称
const path = require("path"); |
需要注意的是,扩展名是区分大小写的
const path = require("path"); |
如果传入的 path 与 ext 都不是字符串,则会抛出 TypeError。
extname
path.extname(path) 返回路径的扩展名,即路径中最后一个 . 之后的字符串(包括 .),如果路径中没有 .,那么返回一个空字符串
const path = require("path"); |
format
path.format(pathOject) 方法根据一个 pathObject 得到一个绝对路径,pathObject 对象包含下面几个属性:
- dir
- root
- base
- name
- ext
可见这些属性都是上面介绍的路径组成部分,它会根据这些属性构建出一个绝对路径。
因为 dir 包括 root,base 包括 name 和 ext,所以当规定了 dir 属性时,则忽略 root 属性,当规定了 base 属性时,则忽略 name 和 ext 属性。
const path = require("path"); |
const path = require("path"); |
parse
path.parse(path) 接收一个表示绝对路径的字符串,返回一个对象,它的作用与 path.format 正好相反,将一个绝对路径拆分为各个组成部分
const path = require("path"); |
打印一个对象如下
{ |
normalize
path.normalize(path) 是用来规范路径的,主要有下面几个作用:
- 将目录分隔符(
/,\\) 转化为特定平台上的分隔符 - 解析
..,.路径 - 将多个连续的目录分隔符合并为一个目录分隔符
const path = require("path"); |
const path = require("path"); |
resolve
path.resove(...paths) 接收多个路径,从右向左对路径进行拼接,直至拼接出绝对路径
const path = require("path"); |
上面我们对 D:\\, C:\\Users, index.html 从右向左进行拼接,C:\\Users 与 index.html 拼接得到 C:\\Users\\index.html,这已经是一个绝对路径了,所以就不在进行拼接了。
如果传入的路径不能拼接出一个绝对路径,那么就会使用当前文件所在的路径拼接一个绝对路径,就相当于 resolve 第一个参数默认为 __dirname
const path = require("path"); |
resolve 方法返回的路径是已经规范化(normalize)了的,并且尾部的分隔符会被删除(除非是根路径)。如果没有为 resolve 传入参数,那么会返回当前文件所在的路径
const path = require("path"); |
join
path.join(...paths) 方法接收一些路径,然后使用所在平台的分隔符(Windows 平台就是 \, Linux/Unix 平台就是 /)进行拼接,最后进行规范化然后返回。
与 path.resolve 方法不同的是,path.resolve 方法一旦拼接出绝对路径后就不在进行拼接,path.resolve 方法返回的是一定是一个绝对路径,但是 path.join 方法只是将多个路径使用分割符进行拼接而已
const path = require("path"); |
如果不为 path.join 传入任何参数的话,那么会返回 .。
sep 与 delimeter
path.sep 与 path.delimeter 是 path 模块的两个属性
path.sep:所在平台的目录分隔符- Windows:
\ - Linux/Unix:
/
- Windows:
path.delimeter:所在平台的目录界定符- Windows:
; - Linux/Unix:
:
- Windows:
const path = require("path"); |
fs
fs 模块是与文件系统有关的模块,可以使用它来进行文件相关的操作。
readFile
我们可以使用 fs.readFile(path, [options], callback) 读取一个文件的内容,该方法接收一个路径(相对路径与绝对路径均可),当读取完文件内容之后,会将读取到的数据作为参数传递给传入的回调函数(callback),该方法还接受一个 options 参数,它可以是一个包含如下属性的对象:
- encoding:指定读取内容的编码,默认为 null
- flag:指定读写模式,默认为 r,表示只读
当没有指定 encoding 时,返回一个 Buffer。options 还可以是一个字符串,当 options 为一个字符串时,表示编码
const fs = require("fs"); |
上述代码读取了当前目录下的 file 文件夹下的 hello.txt 文件,读取完文件后会将内容使用 utf-8 进行解码为字符串,然后将该字符串传递给回调函数。向回调函数传递参数时,第一个参数为错误对象,第二个参数才为实际的内容,之所以将第一个参数设置为错误对象,是为了提醒用户记得处理错误。
如果是第一次接触 Node.js 的话,可能不适合上面回调函数的写法,这种写法是异步写法,之所以这么写是因为 Node.js 是单线程的,为了提高程序执行的效率,所以使用异步的写法(如果无法领会上面这段话,就先放一放,我第一次接触回调函数的写法也是没有反应过来)。
readFile 还有一个对应的同步方法 readFileSync(path, [options]),参数的意义同上,不过这时不需要一个回调函数了,它会将读取到的内容返回
const fs = require("fs"); |
这时你可能会问怎么处理错误,那就是将代码放在 try ... catch 代码块中
const fs = require("fs"); |
同步的方式虽然比较好理解,但是以同步的方式读取文件,会阻塞程序的执行,降低代码的执行效率,所以推荐使用 readFile 读取文件。
这种回调函数式的写法有一个问题就是会产生回调地狱,使得代码难以阅读。有下面三个文件在 file 文件夹下
// a.json |
下面这段代码是依次读取 a.json, b.json, c.json 的内容,并打印出来
const fs = require("fs"); |
为了代码的简洁,已经省略了对错误的处理,可见上面嵌套的代码真的很难阅读,需要花费一番功夫去理解上面的代码做了什么事情。并且如果有更多的嵌套的话,代码的逻辑
正是为了解决这样的问题,在 ES6 中提出了 Promise,写出同样目的的代码,但是嵌套最多只有两三层,代码简单易读。同样,Node.js 也提出了 Promise 的文件系统 API,在 fs/promises 模块下
const fs = require("fs").promises; |
使用回调函数的写法无论有多少层嵌套,改为使用 Promise 的写法,代码的嵌套就只有两层。
writeFile
fs.writeFile(path, data, [options], callback) 的作用是向文件写入内容,path 表示文件路径,data 表示向文件写入的内容,options 是一个可选参数,是一个包含如下属性的对象:
- encoding:将 data 表示的字符串使用该编码写入文件,默认为
utf-8,当 data 为 Buffer 类型的对象时,将忽略该属性 - flag:默认为
w,表示只写 - mode:默认为
0o666
当写入文件完毕时,会执行 callback 函数,callback 函数接收一个错误对象,根据错误对象我们可以判断是否写入文件成功
const fs = require("fs"); |
上面我们向 ./file/world.txt 写入了一个 World 字符串,当写入成功后,打印出写入成功!。
appendFile
上面 writeFile 表示的是向文件写入内容,之前文件的内容全部清除,如果我们希望只是想文件中添加内容,那就要使用 appendFile(path, data, [options], callback),这些参数的意义同 writeFile 相同
const fs = require("fs"); |
执行完上述代码后,world.txt 中的内容为
Hello World |
open
我们可以使用 fs.open(path, [flags], [mode], callback) 打开一个文件,打开文件后便可对文件进行多项操作,例如读取文件,向文件写入内容等等。
操作系统维护着一个打开的文件和资源的表格,每个打开的文件都分配了一个文件描述符,操作系统根据文件描述符去描述和追踪特定的文件。
使用 fs.open 打开一个文件之后,会得到一个文件描述符(file descriptor),一旦分配一个文件描述符,我们便可以使用该文件描述符对文件进行读写。
fs.open 方法接收四个参数:
- path:文件路径
- flags:默认为 r,表示只读
- mode,默认为
0o666,表示拥有可读写的权限 - callback:打开文件成功后会调用该函数,该回调函数接收两个参数
- err:错误对象
- fd:文件描述符
flags 可取如下值
| flag | 意义 |
|---|---|
r |
只读,如果文件不存在,抛出异常 |
r+ |
可读可写,如果文件不存在,抛出异常 |
rs+ |
可读可写,以同步的方式打开文件 |
w |
只写,如果文件不存在,则创建文件 |
wx |
同 w,不过文件不存在时则失败 |
w+ |
可读可写,文件不存在时创建文件 |
wx+ |
同 w+,不过文件不存在时失败 |
a |
向文件追加内容,文件不存在则创建文件 |
a+ |
可向文件追加内容,也可以读取文件内容,文件不存在时则创建文件 |
ax |
向文件追加内容,如果文件不存在则失败 |
ax+ |
同 a+,不过文件不存在时则失败 |
fs.open("./file/hello.txt", "w", (err, fd) => { |
rename
fs.rename(oldPath, newPath, callback) 作用就是重命名,将 oldPath 重命名为 newPath,重命名完成以后会调用 callback 函数,会为该函数传入错误对象
const fs = require("fs"); |
readdir
fs.readdir(dir, callback) 方法是读取一个目录,返回一个字符串数组,数组中的元素是该目录下的文件名和目录名
const fs = require("fs"); |
输出为
["a.json", "b.json", "c.json", "hello.html", "index.html", "world.txt"]; |
如果传入的路径不是一个目录,那么会抛出错误。
rm
path.rm(path, [options], callback)方法是用来删除文件或目录
- path:路径
- options:可选参数,包含如下属性:
- force:如果 force 为 true 的话,如果文件不存在不会抛出错误
- recursive:如果传入的路径为目录,如果 recursive 为 false,那么会报错,如果为 true,则会删除该目录
- maxRetries:当读取文件出现错误时,会进行尝试,该属性设置最大尝试次数,如果 recursive 为 false 的话,会忽略该选项,默认为 0
- retryDelay:重试之间的间隔,单位为毫秒
- callback:回调函数,删除完文件或目录后会调用该回调函数,该回调函数接收一个错误对象
const fs = require("fs"); |
该方法与 14.14.0 版本新增,所以如果要使用该方法需要升级 Node.js 到 14.14.0 版本以上。
stat
fs.stat(path, callback) 方法可以获知文件或目录的相关信息,path 代表文件或目录的路径,callback 是回调函数,接收两个参数
- err:错误对象
- stats:fs.Stats 对象,该对象包含很多与文件信息相关的方法
isDirectory():是否是一个目录isFile():是否是一个文件size:文件的大小(单位为 Byte)atime:最后访问 (access) 时间mtime:文件最后更改 (modified) 时间,是指文件内容的修改ctime:文件最后改变 (changed) 时间,是指文件元信息的更改,例如权限birthtime:文件的创建时间
const fs = require("fs"); |
os
os 模块包含有关操作系统有关的信息,例如操作系统架构,CPU 的相关信息
arch
os.arch() 返回的是操作系统的架构,常见的架构包括
- arm
- arm64
- x32
- x64
- mips
- … …
const os = require("os"); |
cpus
os.cpus() 是与 CPU 信息有关的方法,它返回一个数组,数组中的是一个个的对象,对象的格式如下
- model: CPU 的 model 信息
- speed: CPU 的速度(MHz)
- times: 包含如下属性的对象
- user: CPU 在用户 user 状态下花费的时间
- nice: CPU 在用户 nice 状态下花费的时间,在 Windows 操作系统中该属性始终为 0
- sys: CPU 在用户 sys 状态下花费的时间
- idle: CPU 在用户 idle 状态下花费的时间
- irq: CPU 在用户 irq 状态下花费的时间
const os = require("os"); |
输出
[ |
totalmem、freemem
os.totlemen() 获得系统的总内存,os.freemen 获得系统的目前可用内存,二者单位皆为 Byte
const os = require("os"); |
hostname
os.hostname() 返回主机名
const os = require("os"); |
platform
os.platform() 返回操作系统平台,常见有
- win32
- linux
- freebsd
- darwin
- openbsd
const os = require("os"); |
http
我们可以使用 http 模块搭建 HTTP 服务器,处理前端页面发起的请求,首先我们搭建一个简单的 HTTP 服务器
const http = require("http"); |
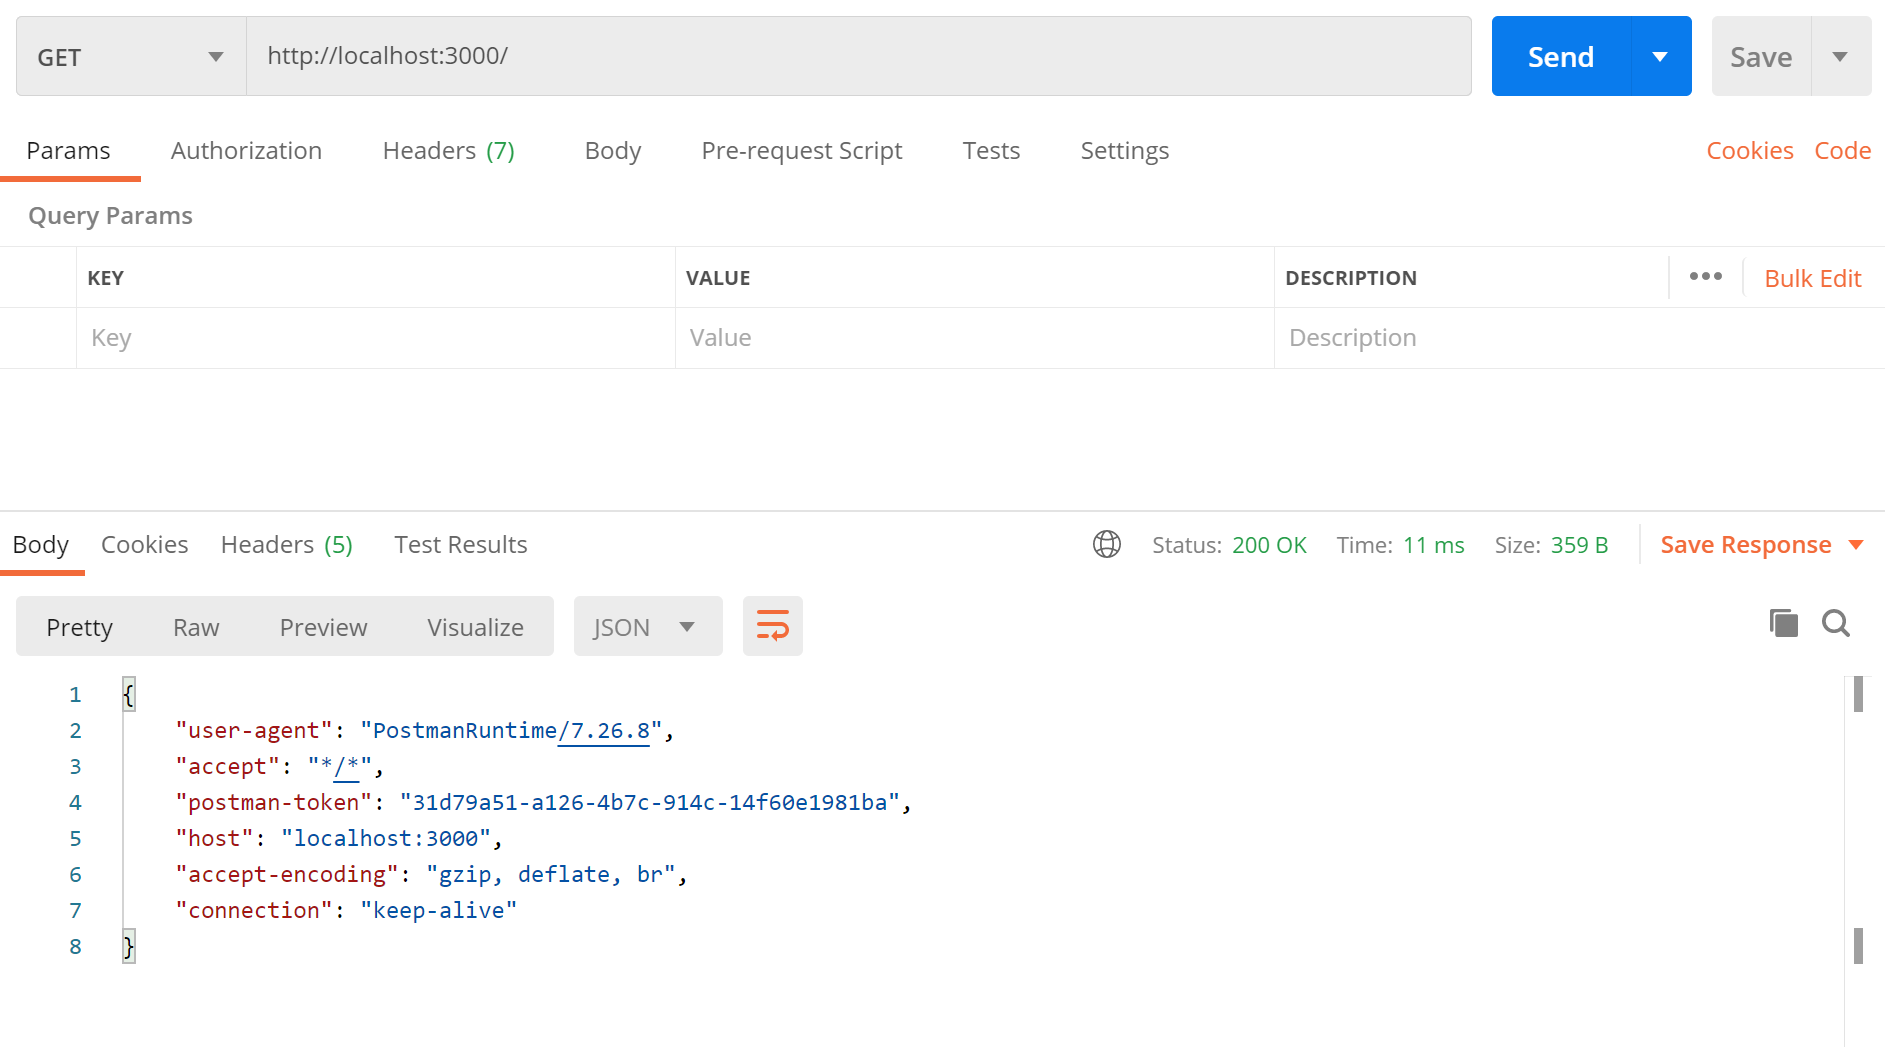
上述我们搭建了一个 HTTP 服务器,它监听了 3000 端口,当有请求到来时,我们返回一个字符串 Hello World!,我们使用 Postman 发送一个请求测试

请求对象
server.on("request", (req, res) => { |
上面的代码我们向回调函数传递了两个参数
- req:请求对象,包含了请求相关的信息,例如请求头,请求参数,请求地址
- res:响应对象,用以设置响应信息,例如响应头,响应内容
在本节介绍请求对象。
req.url
通过 req.url 我们可以过得请求地址
const http = require("http"); |
我们可以利用核心模块 querystring 来解析 url,获得请求参数
const http = require("http"); |

req.method
通过 req.method 属性,可以知道请求方法,常见请求方法包括
- GET
- POST
- PUT
- DELETE
- OPTIONS
const http = require("http"); |
req.headers
req.headers 保存着所有的请求头的信息
const http = require("http"); |
响应对象
响应对象就是用来发送响应信息,包括
- 响应头
- 状态码
- 响应内容
setHeader
我们可以通过 setHeader(name, value) 来设置响应头,例如设置 Content-Type 响应头
const http = require("http"); |
writeHead
我们可以通过 writeHead 来设置响应状态码
const http = require("http"); |

除此之外,writeHead 还可以接收一个可选的对象来设置请求头,它的优先级比 setHeader 方法的优先级高
const http = require("http"); |

write、end
我们使用 res.write 方法来返回响应内容,res.write 方法可以多次调用,在调用多次 write 之后,应该使用 res.end 方法表示响应的结束。
const http = require("http"); |

end 方法也可以接收一个 data 参数
res.end(data); |
参考文章
 微信
微信 支付宝
支付宝