以前我们数据的获取一般都是通过父组件向子组件数据,或者通过向子组件注册自定义事件,使得子组件向父组件传递数据。如果组件的层级比较深,组件数据的传递跨越多个层级,那么无论是从父组件传递数据到子组件,还是从子组件传递数据到父组件,都会写出难看的代码。
Vuex 提供了全局管理数据能力,它集中管理所有需要被共享的数据,无论组件在什么层级,都可以直接向 Vuex 获取数据。
安装
对于 script 标签引入
<script src="https://unpkg.com/vuex"></script> |
对于 npm 项目
npm install vuex --save |
对于 vue-cli 项目
vue add vuex |
可以通过
vue ui通过 GUI 界面创建一个带Vuex预设的项目。
Get Started
首先通过 vue-cli 创建一个 Vue 项目,命令行或 GUI 的方式都是可以的,接着添加 vuex 插件,添加 vuex 插件的时候会在 src 目录下新建 store 文件夹,其中有一个 index.js 文件,我们首先忽略好了,全部删除,只留下 App.vue 以及 main.js。
每一个 Vuex 就是一个数据仓库(store),它保存着应用中大部分的状态,它有两个特点:
store中的数据也是响应式的,当store中的数据发生变化时,依赖于该数据的视图也会相应的更新- 不能直接修改
store中的状态,必须通过显示的提交一个请求,让Vuex处理请求变更数据,这样做可以记录状态的变化,便于调试
我们通过 new Vuex.Store 来创建一个 store,该方法接收一个对象,包括以下属性:
stateactionsmutationsgettersmodules
本小节刚开始接触 Vuex,只使用 state 与 mutations 两个属性,其中
state:保存着所有的数据(状态)mutations:定义更改数据的方法
新建 store/index.js,内容如下
import Vue from 'vue' |
我们定义的 store 有一个数据 count,我们定义了一个修改状态的方法 increment,它可以对 count 递增,最后我们将这个 store 导出。我们在 main.js 中引入这个 store,并且在创建 Vue 实例时传入该 store
import Vue from 'vue' |
这样 Vue 便会将这个 store 注入到所有的组件中,所有的组件都可以通过 $store 这个计算属性访问到它。通过 $store.state 可以访问到 store 定义的数据。App.vue 的内容如下
<template> |
此时页面如下
我们能够访问 store 中的数据了,接着我们看如何修改页面的数据,最简单的方法就是直接通过 $store.state 进行修改。我们为按钮添加点击事件
<template> |
修改成功了,但是我们在上面提及过,我们不能直接修改状态,因为直接修改状态我们无法记录状态的变化,导致我们调试时无法知道状态是如何变化的,如果我们要更改状态的话,需要发起一个请求让 Vuex 帮我们修改数据,发起请求的方法便是 store.commit,该方法接收两个参数:
type:发起的请求的类型payload:需要传递的参数
其中 type 便是我们在 mutations 中定义的方法名,所以我们可以通过下面的方式修改状态
methods: { |
通过 vue-devtools,我们可以观察到每一次数据变化的记录,并且我们可以回到之前任意的一个状态(时空旅行),这会为我们调试程序带来巨大的方便。
上面的 increment 方法并不需要额外的参数,所以我们没有传递 payload,为了演示此属性的作用,我们在 mutations 中新增一个方法 incrementBy,它可以增加指定大小的值
const store = new Vuex.Store({ |
接着我们在 App.vue 中新增一个按钮,表示增加一个指定的值
<template> |
我们希望当点击第二个按钮时将 count +10,我们便来实现 incrementByTen
incrementByTen() { |
注意到此时我们为 commit 传递第二个参数 payload,它会被传递给 mutations 中的 incrementBy 方法,incrementBy 会据此修改数据
我们可以启用严格模式,当用户视图直接修改状态时,将会在控制台给出警告。启动严格模式的方法如下
{10}
state: {
count: 0
},
mutations: {
increment(state) {
state.count++
}
},
strict: true
})
开启严格模式后,当我们直接修改数据时,控制台将会给出警告,当然并不能阻止你修改数据。
核心概念
上面我们仔细介绍了 state 与 mutations 这两个重要的概念,接下来便深入了解深入了解其他重要的概念。
getters
有的时候我们需要获得 store 中数据的派生属性,例如加入有如下 store
const store = new Vuex.Store({ |
我们可能会在很多的组件中需要访问 todos 中有哪些元素 done 为 true,所以我们会在组件中添加计算属性
computed: { |
但是我们需要在每个用到的地方都添加这个属性,代码重复了。Vuex 允许我们在 store 中定义 getter(相当于 store 中的计算属性)
const store = new Vuex.Store({ |
接着我们便可以在组件中通过 $getters.doneTodos 获得此属性了。
getter也可以接收其他getter作为第二个getter
doneTodos(state) {
return state.todos.filter(todo => todo.done)
},
doneTodoCounts(state, getters) {
return getters.doneTodos.length
}
}
actions
我们要求 mutations 中的方法都是同步的(为什么? 官网解释了,但是我没有理解),但是如果我们需要异步的改变数据时,就不得不借助于 actions。以计数器案例为例,我们希望点击 +1 按钮后过 1s 进行增加,我们定义如下 store
const store = new Vuex.Store({ |
在 store 中定义了两个状态,loading 表示正在加载中,count 表示计数器的值;在 mutations 定义了两个修改数据的方法;在 actions 中定义了异步修改数据的方法,该方法首先设置 loading 为 true,表示数据正在加载,经过 1s 后,将 loading 设置为 false,并发出信号增加 count。
App.vue 的内容如下
<template> |
我们希望当点击按钮时,触发 actions 中定义的 incrementAsync 这个 action,触发 actions 需要通过 store.dispatch 这个方法,该方法也同样接收两个参数:
typepayload
具体意义同 commit,修改 App.vue
methods: { |
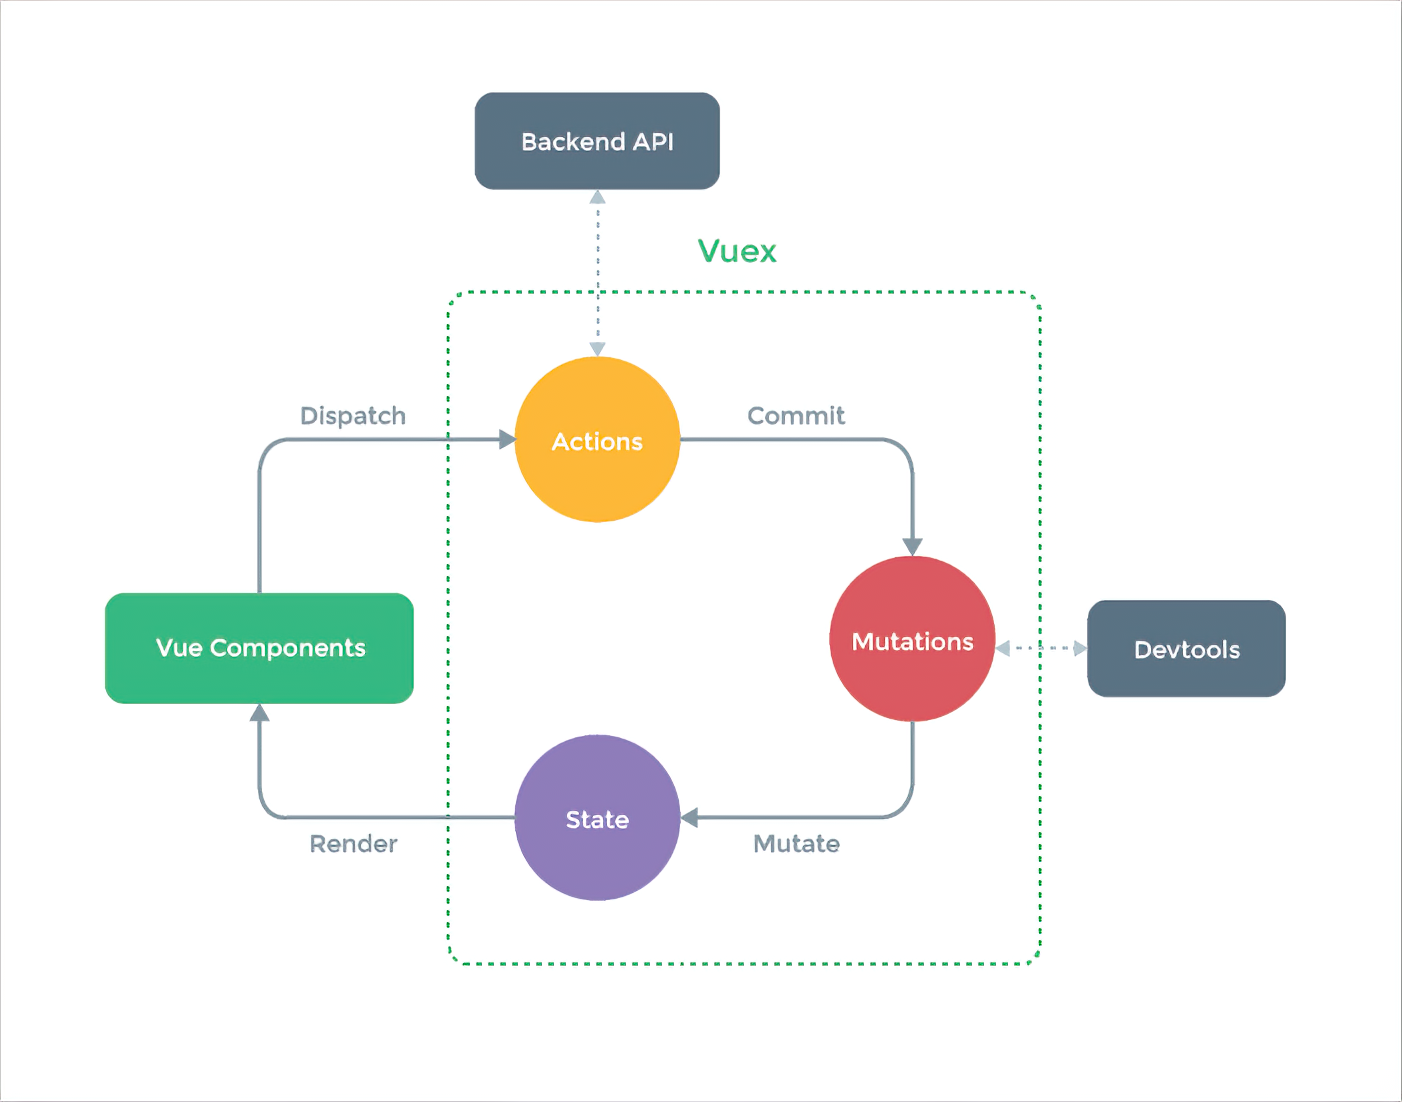
至此给出 Vuex 的工作的过程,想必大家可以很容易的看懂了
modules
因为所有的状态都保存在 store,当项目规模较大时,势必会使得 store 中的状态见得十分臃肿。Vuex 允许我们将 stotr 划分为多个模块,每个模块可以拥有自己的 state、mutation、action、getter
const moduleA = { |
我们定义了两个 module,在每个 module 里面都定义了一个变量 count,并定义了一个 mutation,用以对 count 递增。现如今可以通过 store.state.moduleName 来访问模块其中的状态,App.vue 中的内容如下
<template> |
当我们点击按钮时,我们会发现所有的 mutation 都被触发了
对于 actions 也是一样,也会触发所有符合条件的 actions。因为模块中的 action 与 mutation 都是注册在全局命名空间的,如果希望模块具有更高的封装性,可以为模块添加 namespaced: true 属性,模块中的 action 与 mutation 会被注册到 moduleName/ 下,因此我们可以通过 commit('moduleName/inc') 来触发模块下的 mutation
const moduleA = { |
修改 App.vue
<template> |
使用了命名空间之后,在
action接收到的dispatch与commit均是局部化的,换句话说,在action中dispatch其他action或者commit一个mutation不需要添加模块前缀{12-15}
namespaced: true,
state: {
count: 0
},
mutations: {
inc(state) {
state.count++
}
},
actions: {
incAsync({state, commit}) {
setTimeout(() => {
commit('inc') // => commit('moduleName/inc')
}, 1000)
}
}
}在
getter中接收到的getters也是局部的,我们也不需要添加模块前缀来访问模块内的getter
doneTodoCounts(state, getters) {
return getters['doneTods'].length // => getters['moduleName/doneTodos']
}
}
有的时候我们需要在模块中访问全局的state 与 getter ,可以通过如下方式访问:
mutation:第三个参数可以接收到全局状态rootStategetter:第三个参数可以获得rootState,第四个参数可以获得rootGettersaction:可以直接通过store.rootState与store.rootGetters获得全局state与getters
映射方法
我们在组件中访问 store 中的数据时,需要通过 this.$store.state.xxx 访问数据或者 this.$store.commit(type) 更改数据,每次都需要写一大串。现在 Vuex 为我们提供了映射方法,让我们少敲几下键盘。
mapState
mapState 可以将 store 中的状态映射为组件的计算属性
import {mapState} from 'vuex' |
mapState 返回的是一个对象,因此需要通过展开运算符 ... 将其展开到 computed 中,接着我们便可以通过 this.count 访问到 store 中的 count 了。
通过 mapState 还可以将模块映射到计算属性
computed: { |
从而可以通过 this.user.xxx 访问到模块 user 中的数据。如果希望将模块中具体的数据映射到组件的计算属性,那么你可以这么写
computed: { |
我们便可以通过 this.username 与 this.age 访问到模块 user 中的数据了。上面我们还有一个简便写法
computed: { |
maoState 方法还可以接收一个对象来定义映射关系
...mapState({ |
mapGetters
mapGetter 的使用同 mapState,可以将 getter 映射到计算属性
computed: { |
如果你想为计算属性取别名,可以传入一个对象
computed: { |
mapMutations
mapMutations 可以将 this.$store.commit(type) 映射到组件的方法上
methods: { |
mapActions
mapActions 可以将 this.$store.dispatch(type) 映射到组件的方法上
...mapActions({ |
插件
我们创建 store 时,还可以传入一个 plugins 选项,使得我们可以为 Vuex 添加插件。Vuex 插件就是一个函数,它接收 store 作为唯一的参数,plugins 为我们暴露出每次 mutation 的钩子
const persist = store => { |
我们写一个简单的插件,来持久化 store,每次重新启动项目时从 localStorage 中读取数据,每次状态变更时将数据存入到 localStorage 中
const persist = store => { |
在创建 store 传入该插件
const store = new Vuex.Store({ |
参考链接:
 微信
微信 支付宝
支付宝